Friday, April 29, 2011

Noah's Ark Dessert/Appetizer Table

For my son's baptism I decided to create a Noah's Ark themed dessert/appetizer table.  I was inspired by Amy Atlas of Amy Atlas Events.  She features AMAZING guest dessert tables on her blog http://blog.amyatlas.com/.  Check it out sometime if you have a chance.

First I started by deciding on the desserts and appetizers I wanted to serve.  I definitely wanted to have cake so I made this 6" layered cake.  I created the animals with royal icing and the ark was sculpted with Rice Krispie treats and covered with fondant.

The table also featured pizza mini-muffins.  These are a great finger food and super easy to make.  I added pepperoncinis to them for a little extra flavor.


One of my favorite featured desserts were the cookie dough cake balls.  I purchased these from the Sweet Retreat Cupcake Boutique in Edina, MN.  I could have probably eaten this whole tray!  My husband ate more than his fair share of them.  

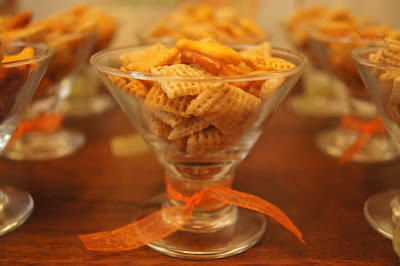
I also made homemade chex mix and poured it in these cute miniature glasses.  I added green and orange ribbon around the stems to spice them up.

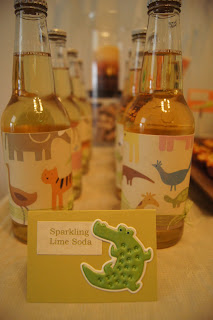
For drinks I purchased lime and tangerine Izze Sodas.  To keep with the Noah's Ark theme I wrapped them with this playful animal paper and added green and orange ribbons to identify the flavor. 

 I also offered candy sticks.  I placed them in a hurricane glass jar which I typically use to hold a candle.  I thought this was a unique way to display the candy sticks and the corks coordinated well with the wooden serving platters.

I wanted to include at least one thing that was healthy so I filled a trifle bowl with fresh veggies.

The table turned out to be a hit at the party!  If anyone is interested in a dessert or appetizer table for a party let me know.  It was so much fun to make and there are endless possibilities!

Wednesday, April 20, 2011

Tsoureki

Tsoureki, what is that?  It's the name for traditional Greek Easter Egg bread.  I've never made this before and thought it would be fun to try for Easter. 
Start by hard boiling some eggs.  Take as many eggs as you would like to dye and place them in a pan of water.  You will need 3 eggs for each large loaf of bread and 1 egg for each small loaf of bread that you decide to make.

Bring the water to a boil.  Once the water is boiling, remove the pan from the hot surface, cover, and let the eggs sit in the hot water for 14 minutes.  After 14 minutes, drain the hot water and add cool water to the pan to help the eggs cool.

Once the eggs are cooled, it is time to dye them!  You can use an Easter egg dye kit from the store or you can use food coloring and vinegar. 

Place about 1 tsp. of vinegar and 1 cup of water in each cup.  Add desired amount of food coloring depending on how bright you want your eggs to turn.  Let the eggs dry once you have dyed them.


Now it's time to make the bread.  I'll have to admit, I didn't follow a homemade bread recipe for Tsoureki.  I just used a frozen load of Rhodes bread dough.  I think you can probably use any homemade bread recipe (or frozen dough) to make Easter Egg bread. 

To make a large loaf of Easter Egg bread, divide your dough into 3 sections.

Once you have divided the dough, roll each section into a long rope.
Take the 3 rolled dough ropes and braid them together.

Once braided, form the dough into a circle and pinch the ends together.

Now take three Easter Eggs and insert them into the braided bread dough.  I used red dyed Easter eggs for my Tsoureki.  It is a Greek Orthodox tradition to dye Easter eggs crimson red.  The redder they are, the better.  My great grandma used to dye her eggs with Rit Dye.  That's probably not food safe, so I wouldn't recommend it.  :)  On Easter there is a tradition of cracking the red eggs.  This involves two people, each taking a red egg and smashing them together.  Whoevers egg does not crack will have good luck for the year to come. 

To make small loaves of Easter Egg bread take two small section of dough and roll each section into a rope.  Take the two ropes and twist them together.
Once the ropes are twisted together, form a circle and pinch the ends together.  Place one Easter egg in the center of the dough. 

For the finishing touches, beat one egg with appx. 1 Tbsp. of water and brush the mixture over the bread dough.  This will give the bread a shiny coating.

Lastly, add any spices, toppings, or decorations to the dough.  For the small egg bread I added blue sprinkles.  On the large egg bread I added parmesean cheese and garlic salt.  Bake the bread according to the instructions...

and enjoy your tasty treat!

Wednesday, April 13, 2011

Easter Baskets

Easter is my favorite holiday.  I love the bright colors, the springtime (which means farewell to the snow), and CANDY!  Here are some fun, new items that you may want to get to fill your Easter baskets this year! 
   
 Peepsters: These are chocolate candies filled with marshmallow cream and they are delicious!  If there is one thing on this page that you decide to try, I would highly recommend these.  They come in both milk and dark chocolate.  I tried the dark chocolate Peepsters.

Here's a photo of the delicious marshmallow center.  We ate the whole bag already, so I'm going to have to get a new one for Easter!

Sour Patch Jelly Beans: I haven't tried these yet, but my husband loves Sour Patch Kids so I thought these would be great for his Easter basket.

Blow Pop Minis: Blow Pop suckers are always a favorite.  These miniatures are easy to eat and have the same great taste.  Their is gum in the center, however I think you would need to eat several to get enough gum to actually chew.

 Here's what the Blow Pop Minis look like.  They are smaller than I had anticipated.  You get quite a few in each pack.

Peeps Rainbow Pop:  I saw this as I was walking down the Easter aisle at the store and just couldn't resist.  This Peep pop is so cute!  It's basically different colored Peeps on a stick.  Peeps remind me of my best friend growing up.  I think this is a must for the Easter basket!

Crayola Colored Bubbles: Ok, so this doesn't have anything to do with candy or sugar but I saw these and thought they would be a fun addition to the Easter basket.  There were only green and orange bubbles left when I saw these at the store, but they come in multiple colors.  Once I got home, I opened them and tried blowing some bubbles.  The bubbles are very colorful, but after trying them out I don't know that I would recommend them for kids unless you are prepared for a mess (see next photo)
.   
I blew some bubbles onto a piece of paper and this is how it turned out.  Looks like paint, right?  If you read the small writing on the bottle it says to wash off surfaces immediately.  Although these are very messy I thought it might be fun if for a kids birthday party if you bought everyone white t-shirts and let them blow bubbles on each other to color their shirts.

Coconut M&Ms: I first tried coconut M&Ms this fall in a single serving bag.  Since then I have been waiting for them to be offered in larger bags and they are finally here for Easter!  If you like coconut and chocolate you will love these M&Ms.

Old Fashioned Candy Sticks: So these aren't new at all but they are so bright and colorful I thought they were a great Easter treat.

Almonds: I thought I should add something somewhat healthy, so I found these flavored almonds.  This bag is a mixture of vanilla & caramel almonds.  They also had a bag of cinnamon & chocolate almonds that would be good.  These almonds are sweet and heart healthy! 

Hippity, hoppity Easters on the way!

Wednesday, April 6, 2011

Happy Birthday to Me!

For my birthday I decided to make something a little different, a Rice Krispie cake.  I got this idea from a friend of mine.  It was really quick and easy to make. 

Here is what you will need to make this cake:
(2) 6" Round Pan
(2) 10" Round Pan
Wax Paper

Per Batch of Rice Krispies
6 Cups - Rice Krispies (any flavor)
1 Bag - Marshmallows
2 Tbsp. - Butter

Chocolate Wafers (for filling & decorating)

I used Cupcake Rice Krispies for my cake.  They are Rice Krispies sweetened with rainbow sprinkles.  Very fun for a birthday cake!!  It would also be neat to use different types of Rice Krispies for each layer of the cake, for example plain Rice Krispies for one layer and Cocoa Krispies for the other layer.

Start by pre-measuring 6 cups of Rice Krispies into a bowl.

Next, line the round pans with wax paper.  This will allow you to easily remove the Rice Krispie cakes once they are pressed into the pan.

In another mixing bowl, pour in one bag of large marshmallows.  Slice 2 Tbsp. of butter into smaller chunks and add to bowl.

 Microwave the marshmallows and butter for 2 minutes.

 Remove bowl from the microwave and stir the marshmallows and butter together.

 Microwave the mixture for an additional minute.  Again, remove the bowl from the microwave and stir.

Once you have stirred the marshmallow and butter mixture so that there are no lumps, add 6 cups of Rice Krispies.
 Stir in the Rice Krispies so that they are evenly coated with the marshmallow and butter mixture.

Once stirred, press the mixture into the round pans.  Helpful hint: spread Crisco or butter on your hands to prevent the Rice Krispie mixture from sticking to your hands.

You will need to make 4 batches of Rice Krispies to fill 2 - 6" round pans and 2 - 10" round pans.

For the bottom side of each cake layer, form a ridge around the edge of the pan by pressing down with your fingers.  If you want to fill the center of each layer with chocolate, this will prevent the chocolate from leaking out the sides of the cake.

Allow the Rice Krispies to cool for 5-10 minutes.  Then remove the Rice Krispie cake by pulling on the edges of the wax paper.  Peel the wax paper off the cake.

I filled each of the cake layers with chocolate.  To do this, you will need either Candy Melts, as shown above, or a bag of chocolate chips.  Place the candy melts into a microwave safe container.  Microwave for 30 seconds, remove, and stir.  Repeat until the chocolate is fully melted.

 Once the chocolate is melted, pour it onto one cake from each of the layers.  Spread evenly with a spatula.

After the chocolate has been spread on the bottom half of each cake layer, place the second half on top.

To decorate this cake I used green and pink chocolate wafers.  You can either use colored chocolate or frosting to decorate.  If you choose to use chocolate to decorate, melt in the microwave as previously mentioned.  Put the chocolate in a sandwich bag and snip the corner with a scissors.

Apply pressure to the bag with the melted chocolate and zig-zag back and forth across the cake.  Do this on both layers of the cake.  I used green chocolate on the bottom layer of my cake and pink chocolate on the top. 

Lastly, place the top layer of the cake onto the bottom.  If using chocolate to decorate this will help the top layer stick to the bottom.  If using frosting to decorate, spread frosting on the bottom side of the top layer so that it will adhere to the bottom layer.  Now you have a Rice Krispie cake!  Have fun with this and try different variations by using assorted types of Rice Krispies, fillings (chocolate, caramel, marshmallow), and decorations!